F_Reparaties - F_Repairs (24.05.2008 )
Probleem: F Steering Adjustments
Watch
it: on all drawings in chapter F the steering gear is drawn in RHD-version (so
upside down) and the man who drew it had never seen the inside: in fact the
pinion is helicoidal and the cogs on the rack aren't square to the movement.
Drawings F3 and F4 should be imagined upside down (for Sabras).
Op alle
tekeningen in hoofdstuk F staat het stuurhuis getekend in de RHD -versie.
opgelet dus, verder zijn tandrad en -heugel op de tekening niet juist
getekend... het tandrad is helicoïdaal en de heugel heeft schuine vertandingen.
De tekening F3
p. F4 moet dus ondersteboven bekeken worden.
Adjusting
of the stiffness of the steer is done by loosening the big copper bolt (200232
steering gear damper housing on the drawing down under, on a Sabra above)
and then removing or adding some shims. By removing shims the bolt pushes the rack harder
against the bronze bushes that it glides in. I see not many reasons to
make the steer stiffer but if you remove some shims make sure to make a
test-drive and make sure that the steer comes back to straight driving from
either left or right full turn. If you have wear then removing all play when
you're steering straight on will make the wheel "stuck" in the outer
positions - frightening.
De regeling van
de stroefheid van het stuur doe je door de grote koperen vijs (200232 - steering
gear damper housing) (op de tekening onderaan - op
een Sabra bovenaan het stuurhuis) los te draaien en er één of enkele
"shims" (zie tek) af te halen of toe te voegen. Door de shims te verwijderen
drukt de vijs dieper in het stuurhuis en druk je de tandheugel harder tegen de bronzen bussen aan. Eén voor één
verwijderen en testen..opgelet ook testen in de uiterste standen, als je te veel
speling wegneemt in het centrale meest versleten gedeelte kan het zijn dat het
stuur te vast zit in de uiterste standen. Als
er geen speling is dan druk je gewoon dwars op de tandheugel zodat die slechter
beweegt.
Also
watch out while dealing with the "adjusting nut" (200184 and UNFLN500
small 1/2' nut) this removes forward-back play of the pinion. If you
loosen this for some turns you'll notice that you can pull out and push back in
the whole steer - steering axle - pinion unit. It should be fastened so that you
don't have no play in the direction of the steering axle. If you turn it in with
too much torque then you'll ruin the (part 200345) pinion thrust washer that
tries to keep the pinion down in the sleeve where it sits in. The adjusting nut
should push the pinion thrust washer against the 200091steering wheel eccentric
sleeve - nothing more.
Opletten met de
adjusting nut (200184 en UNFLN500)(11/16-18mm kleine moer 13M.1/2): die neemt speling weg
van de pinion. Hetzelfde: als die te vast staat
keert het stuur bij het rijden na een bocht niet meer vanzelf naar de
rechtdoor-positie. De adjusting nut belet de pinion (200089) van vooruit te schuiven bij draaiing
naar rechts aan het stuur. Beste stand is dus "juist
rakend". Het naar binnen schuiven van de pinion wordt belet door een
ring rond de pinion (200345 - pinion thrust washer). Als deze ring tegen
de (200091 steering wheel eccentric sleeve) zit en de adjusting nut zit juist
tegen de kop van de pinion is de speling minimaal.
Six
years ago I learnt from Geoff Cooper that the play of the steering gear should
be removed by turning the eccentric sleeve (200091). This sleeve is cylindrical
and can rotate almost a full turn in the steering house and it holds the pinion
in a cylindrical hole (with two bushes and a rubber seal). The cylindrical
hole is drilled out of the center so when you turn the sleeve the pinion moves
closer to or farther away from the rack. To adjust there's a small pin sticking
out of the sleeve. Once you loosen the two bolts 200228 you can turn the
sleeve with the pin (if the sleeve isn't stuck by dirt that is). Don't push to
hard, only apply hand-force.
Nog bijgeleerd
van Geoff Cooper (Reims 2001)...op de tekeningen is dit niet duidelijk te zien
maar het gaat om "part 200091 - steering wheel eccentric sleeve".
Dit is een "bus die de stuurstang geleidt in het
sturhuis. Deze bus is cylindrisch en er is excentrisch een uitsparing in
gelaten voor de pinion. Deze eccentric sleeve wordt in
het lichaam van het stuurhuis gedrukt (vastgedrukt) met bouten 200228 en/of 5391
(moer halve duim) die een ring tegen de "bus" aan trekken en zo de bus
in het stuurhuis duwen.
Deze bus nu geleidt de tandheugel maar het gat waarin het tandrad over bijna
zijn volle lengte draait, is excentrisch geboord en heeft ergens een "pinnetje" uitsteken.
Als je dat "pinnetje" naar boven of beneden duwt en zo de bus draait,
dan beweeg je het gat, waardoorheen de stuurstang binnenschuift, naar
boven of beneden. Dit is de eigenlijke regeling van speling van het stuur. Je drukt inderdaad
het tandrad vaster tegen de
tandheugel. Voorzichtig ! je kan hier heel gemakkelijk een ontoelaatbare
druk op het stuursysteem zetten de regeling gaat het beste als je het
pinnetje met de hand kunt bewegen.
I had quite some wear on the bronze bushes that lead the
rack. I had a new rack made but I didn't use it as the wear on the old
rack istelf was minimal. I did replace the 200345 (pinion thrust washer that I had
probably ruined myself by applying to much torque to the adjusting nut (200184).
Bij mij zat er sleet
op de bronzen bussen waarin de tandheugel naar links en rechts beweegt;
deze bussen heb ik vervangen. Ik monteerde terug het oude tandrad en
tandheugel. Wat ik wel verving is de 200345 - pinion thrust washer die was
gebroken - gescheurd, vermoedelijk door te hevig aan de adjusting nut te draaien
en daardoor vermoedelijk de oorzaak van de stroeve gedeelten in mijn
stuurbeweging.
The
bushes of the rack are: outside 1"- 1/8 = 28,57mm, inside 1" = 25,40mm,
width
1"- 1/2 = 38,10 mm are some standard and are sold with teflon coating. The
ones that I got out had the marking "16DU24".
De busjes van de tandheugel meten: buitenmaat
1"- 1/8 = 28,57mm, binnenmaat 1" = 25,40mm, breedte
1"- 1/2 = 38,10 mm Deze bussen horen standaard te koop te zijn
met teflon bekleding binnenin. Op een verwijderde bus stond 16DU24
* AH een andere * 16DU24 LG. Het sterretje is een onleesbaar
teken (iets met een G). Ik haalde ze bij Goossens Elisabethstraat te Antwerpen
(ondertussen overgenomen door Van In Aandrijvingen - zie Adressen pagina).
As
I still had too much play I kept looking and noticed that there's also bronze
bushes (and a rubber seal) to guide the pinion through the eccentric sleeve.The
bush closest to the rack had a play of more than 1.5mm. Replaced this one
to: inside 3/4" = 19,05mm, outside 7/8"
= 22,22, width 3/4" = 19,05.The one I took out was marked "12DU12
* FH".
Kreeg de speling
niet weggeregeld en dan gemerkt dat in de eccentric sleeve ook bussen zitten om
de pinion te geleiden. De bus vooraan, vlak bij de tandheugel had meer dan
1,5 mm speling.
Deze bus vervangen: 3/4" = 19,05mm binnenmaat, 7/8"
= 22,22 buitenmaat, breedte 3/4" = 19,05.
Op de bus staat vermeld: 12DU12
* FH
I
didn't replace the bush on the upper (outside) side of the eccentric sleeve.
It looked difficult and there was no play over there.
Aan de andere
zijde van de eccentric sleeve zit ook een bus, die vertoonde geen merkbare sleet
en nog iets dichter bij de stuurstand zit een rubber afdichting die moet
beletten dat er vet uit het stuurhuis naar boven spuit en/of spatwater het
stuurhuis in loopt. Het leek niet simpel van deze afdichting te
verwijderen en terug te plaatsen. Daarom ook die bovenste bus niet
vernieuwd.
The
steering is now like a normal car!
Al deze bussen
zijn niet volledig ringvormig, er is telkens een sleuf overlangs die toelaat van
de dikte iets aan te passen.
Het stuurhuis voelt nu spelingloos aan. Zoals een normale auto!
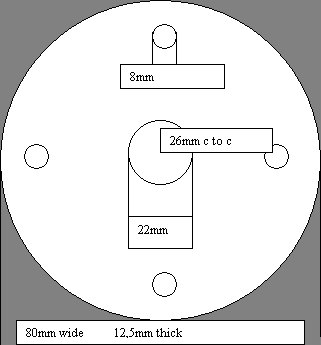
Om opzoekingen
mogelijk te maken...registratie: part # 200234:
Mijne is redelijk vervormd c to c zou best 1 inch kunnen zijn.
Part
200234: the width between c and c could best be one inch.
Tony Heath
suggests this could be the same as on a Triumph Herald?
It's made by silentbloc they offered me to remake it: they said they would
accept any order of over 1000€ (or was it 2000€?)
Mr Pigeon says it can be replaced by the rubbers of a transmission axle for some
front-driven French cars.
Off course Silentbloc refuses to tell in what cars they were used (if they know
at all).
In
one shot also replaced the rubber grommet that protects the rack: bought it with
Quinton Hazell part QG1000. It's a harmonica-like thing where you cut off
the part you don't need. Don't forget to make a small hole in the grommet to let
the air in and out.
Ineens de rubber
hoes ter bescherming van de tandheugel vernieuwd. Te koop bij Quinton
Hazell UK part nummer QG1000.het is een rubberen harmonica met versmallingen in
trapjes aan de uiteinden. Als je de versmallingen wegsnijdt tot waar ze
nodig zijn hou je een bijna origineel stuk over. Deze hoes gevonden
bij Van Der Raay August van De Wielelei Deurne. Niet vergeten een gaatje in de
hoes te knippen, dat de lucht eruit kan.
Watch out, while working on the above, I thought it would be best to paint the #200235 - steering column. As I did the #5250 Steering Bush Nacelle Bracket Bush got stuck to the (now thicker by paint) steering column as I had painted it right to the thread for the #5392 fixing nut. Result was that the bronze bush turned along with the steering column within the 5249 (rubber) Outer steering Column Nacelle Bush - noisy and not safe at all! To remove the paint I had to remove even the steering rack.
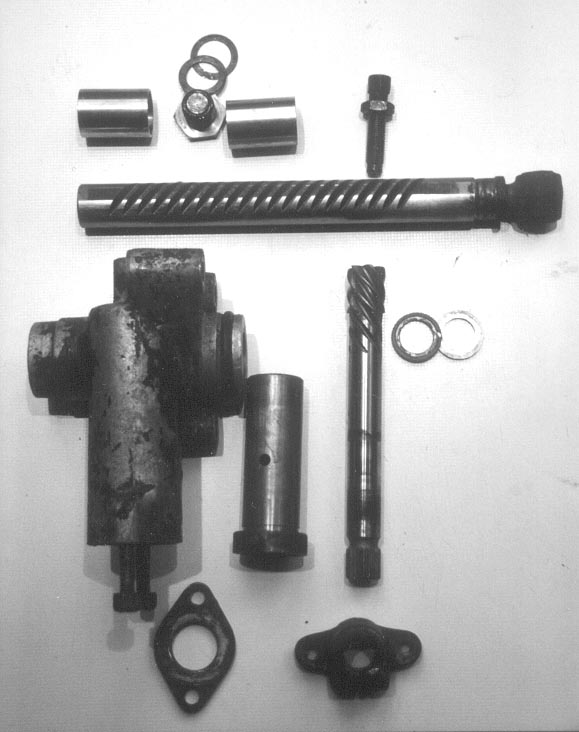
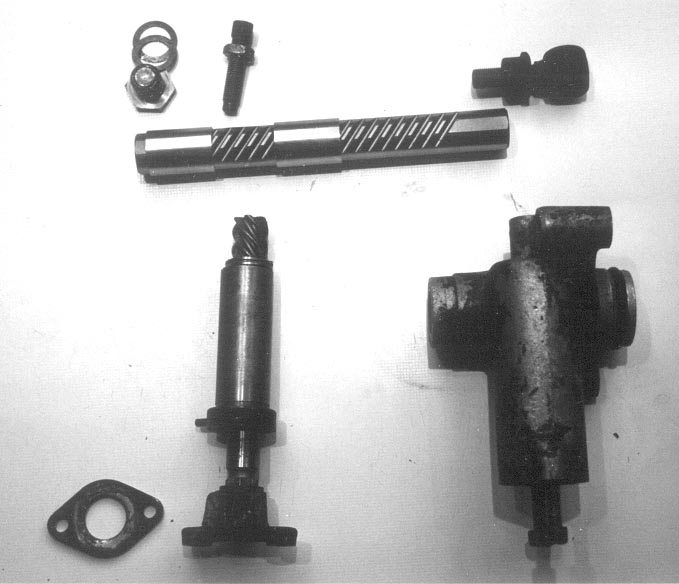
Jef Neefs
Probleem : F Steering damper part 200230
Steering damper. Have a look at a VW Beetle steering damper. I used one on my Sabre a few years ago. They are designed to operate sideways. Make sure they are fitted with the correct side up as it affects the hydraulic valve inside. However having said all that I found that it made the steering even heavier and with wider tyres 165-15 there was not a great amount of steering wheel kick on bumps anyway. So I took it off eventually.
Geoff (Cooper)
Probleem: F Rack & Pinion
Geoff
Cooper informed me that rack and pinion were made by Alford & Alder - not
existing anymore. The rest should be Reliant.
Hoorde recent
van Geoff Cooper dat de tandheugel en het tandrad gemaakt werden door
"Alford & Alder", een bedrijf dat niet meer bestaat.
De behuizing en de rest zou van Reliant zijn.
Probleem : F Steering arms ?? - bushes - extensive play
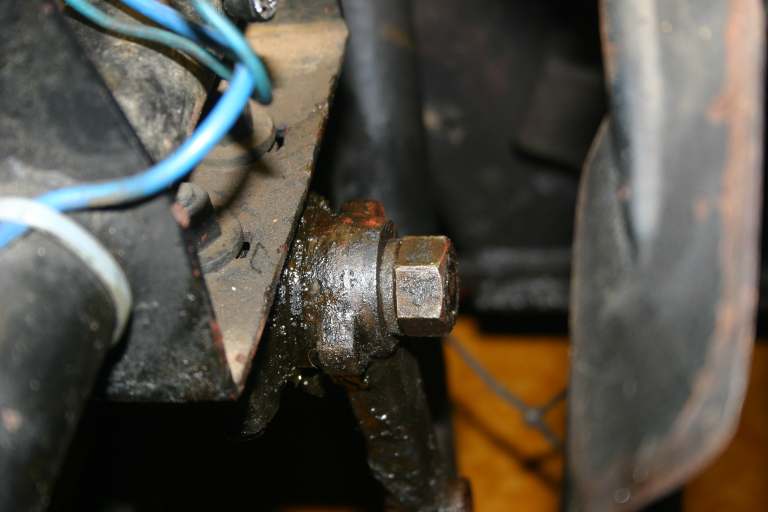
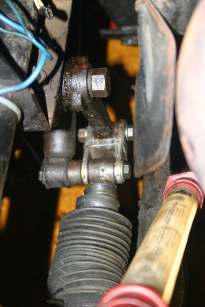
2006 MOT the man noticed that when turning the steering wheel from left to right, before any movement was passed from the steering gear rack (200090) to the steering rods (200700) the idler bracket shaft (200176) moved forwards when turning right and backwards when turning left. Picture of steering system
Repair:
First suspect was the idler bracket which I thought would be stopped from moving
for-aft by something. The pic showed two thick felt washers, no other
device to stop for-aft movement. See pics: When the connection between steering
gear rack and idler arm was removed the idler bracket could freely move for-aft
squeezing the felt washers.
|
|
|
This lead to the
conclusion that the for-aft-movement of the idler bracket was to be stopped by
something else: Not the track rods i.e. so suspicion went to the combination:
steering gear rack, link-steering gear (200960), and its bushes.
As all was dismantled I soon found quite some play between the bush in part
200072 (steeering gear rack end[LHD]) and the UNFB409A.
As the steering damper was intended to hamper or "damp" (quick)
movements of the steering rack and it is attached excentrically (from the rack)
to the end of UNFB409A it could cause a for-aft movement on the other
(right) side of the link-steering-gear.
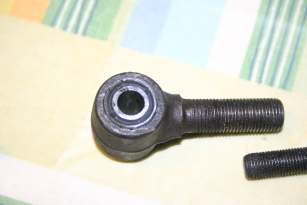
I noticed that part 200072 held a bush in it, in fact two bushes, the outer
fitting inside 200072 inside the outer there was a rubber bush and inside the
rubber bush another metal bush with 3/8 inside dimension. See rightmost bush on
the pic: John Valler sold it to me last year (2006-Goodwood)

Glad I bought it because for weeks now I've been trying to locate another spare but in vain.
| The above shown bush should be fitted in 200072: | |
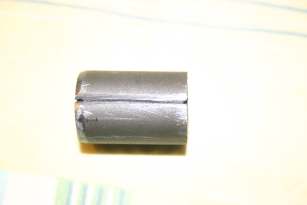
| But the bush was little too wide, perhaps could have fitted it by heating 200072 and freezing the bush but I didn't dear so I sawed a groove in the outer bush and I filed one side down so it would get more easy in part 200072. Pushed it in on a vice, needed quite some power. | |
| As the bush was to fit between the two legs of the "H" 28,3mm wide and the inside bush was 31,1mm and the outside 29,1 I filed them a little shorter before pushing them in: | |
| Other way to look at it. | |
| Fitted, btw the thread of 200072 is 1/2' UNF | |
| And fitted on the car used an 12cm long UNF 3/8 bolt to lock the steering gear rack end, the link steering gear ("H" - 200960) and the damper together. | |
| On the other side of the "H" part 200960, there was a shouldered bolt (part 200956) (Pin Idler Arm) connecting the 200960 link to the idler bracket rear arm (200071). When removing it, some years ago I thought it was a UNF 3/8 bolt with a bush shoven over it. As I ruined it trying to remove the bush, I replaced it now with a new-made bush outer width 13,5mm, inner 3/8 ' and 38,3mm length. The 3/8 bolt simply holds the bush in it's place within the "H". !!Could be I drilled the holes in the "H" and the idler arm wider... to 13,5mm to catch the home-made bush. | |
| Anyway: if at MOT they are gonna find play in
the steering they'll have to use a microscope. Unbelievable that I
drove that car about without knowing it could drive normally... thinking
this was normal for English cars to have some play here and there: up to
3-4 cms on the steering wheel between right and left.
In fact I followed the "normal" way. You have some play and you identify the worst part, you repair it and then you still have play... but it's far less so it's OK. But after some time you start looking for that remaining play. When it's repaired the play isn't significant anymore, but then again you find some things to repair, and again... perhaps I'm at the end now. But could well be that I will have to start again |
|
The bush right on the pic above, was made by: Robush Limited Bridge Farm Ash Road Wickham Market Suffolk IP13 0AA England Tel (+44) ( 0 ) 1728 748336 www.robush.co.uk The part No is CAFB2030 fully bonded bush |
|
Mail of bel mij als je tips, hints of kennis op dit gebied hebt... 03/236.00.84

